Choosing the right shotgun choke is essential for any shotgun enthusiast, whether you’re hunting, shooting clays, or hitting targets on the range. A shotgun choke controls the spread of shot pellets, making it an important factor in achieving accuracy and effective range. In this comprehensive guide, we’ll walk you through everything you need to know about shotgun choke tubes, their various types and how to choose the right one for your shooting situation. This article is packed with insights to help you make an informed choice and enhance your shooting performance.
What Is a Shotgun Choke and How Does It Work?
A shotgun chokeis a device inserted at the muzzle end of a shotgun’s barrel to control how tightly or widely the shot pellets spread after being fired. By adjusting the amount of constriction at the muzzle, a choke determines how the pellets disperse, which can significantly affect your accuracy. The tighter the choke’s constriction, the narrower the shot pattern, which is ideal for long range shots. On the other hand, a more open choke allows the pellets to spread out more quickly, making it suitable for close range shooting.
Shotgun chokes come in a variety of types, including fixed chokes (built into the barrel) and screw in chokes, which can be easily replaced depending on the shooting situation. The development of interchangeable screw in chokes by shotgun manufacturers has increased the versatility of shotguns, allowing shooters to tailor their firearm to specific shooting environments, competition and game.
Choke tubes of various constrictions allow for more precise control over the spread of shot, and understanding the role of different chokes is key to improving your shooting accuracy.
Why Do You Need the Right Shotgun Choke?
Choosing the right shotgun choke can make all the difference in hitting your target, whether you’re shooting at 30 meters, 40 meters, or beyond. A shotgun’s performance relies heavily on the pattern density produced by the choke. By selecting the proper amount of choke constriction, you can ensure that the percentage of shot inside the target zone is optimised for your specific shooting needs.
For hunters, having the right choke is crucial for hitting fast moving or distant game. For example, a full choke keeps the shot tightly grouped, making it easier to hit waterfowl at long distances. Conversely, for upland bird hunters, an open choke such as an improved cylinder is preferable, as it provides a wider shot pattern to catch birds in flight at shorter ranges.
In competition, such as skeet or trap shooting, using the right choke improves your chances of hitting clay targets. A cylinder choke or improved cylinder choke is ideal for the quick, close-range shots typical in skeet, while a modified or improved modified choke is better suited for trap or field and game, where the targets are launched farther from the shooter. Understanding choke patterns, and the effective range they provide, is essential to making the most of your shotgun’s performance.
Types of Shotgun Chokes: Full, Modified, Cylinder, and More
There are several types of choke constrictions, each designed to perform optimally at different ranges and for different shooting situations:
Full Choke: The full choke offers the tightest constriction and is best suited for long range shots up to 40 meters. It provides a dense shot pattern, making it ideal for waterfowl hunting, fox drives and some trap shooting events. Full chokes concentrate about 70% of the shot pellets within a 30-inch circle at 40meters.
Modified Choke: A modified choke offers a moderate amount of constriction, suitable for shots between 30 and 40 meters. This choke is versatile, performing well for general hunting and mid-range target shooting. It keeps approximately 60% of the shot charge inside a 30-inch circle at 40 meters.
Improved Cylinder Choke: With a slight constriction, the improved cylinder choke is ideal for short range shots (typically under 30 meters). This choke is often used for game birds like quail, rabbits, as well as skeet shooting. It allows about 50% of the shot to hit a 30-inch circle at 25 meters.
Cylinder Choke: This choke provides no constriction at all, offering the widest possible spread of shot. A cylinder choke is typically used for close range shooting, or skeet, as it allows for a wide, even spread at short distances.
Each type of choke tube offers different advantages, depending on the distance and size of the target, as well as the types of shot being used. Shotguns equipped with screw in choke tubes allow shooters to easily swap out chokes depending on the situation, maximizing the versatility of their firearm.
How to Choose the Right Shotgun Choke for Hunting
When choosing the right shotgun choke for hunting, it’s important to consider the type of game you’re pursuing and the typical distance of your shots. Selecting the right choke can significantly increase your chances of success in the field.
Waterfowl Hunting: Waterfowl hunting requires non-toxic shot. The choice of a non-toxic shot can affect your choice of choke tube selection. Beretta does not recommend using chokes that constrict more than modified for Steel Shot. Improved, modified, light full, and full are chokes that we do not recommend for steel shot use. Check with the ammunition and choke tube manufacturers for their recommendations before making your selection.
Small Game Hunting: When hunting birds like quails or vermin like rabbits, the shots are usually taken at closer distances, often between 20 and 30 meters. An improved cylinder choke is a good choice here because it offers a wider spread, allowing for better accuracy on fast moving game.
Large Game Hunting: For larger game, such as feral pigs, some hunters use shotguns with slugs. In this case, a cylinder or improved cylinder choke is recommended.
Your effective range can also depend on the shot size you’re using and the type of shotgun shells being loaded. To ensure the best possible results, it’s crucial to match your choke to both the game and your shooting distance.
What’s the Best Choke forTrap, Skeet and Sporting/Field and Game?
In skeet shooting, targets are launched at close ranges, and quick reflexes are essential. The best choke for this discipline is of course a skeet choke, or alternatively an improved cylinder or cylinder choke, as these provide a wide, even shot pattern that increases the chances of hitting the fast-moving clays. Skeet and trap shooters often favor these open chokes because they offer a broader spread, which compensates for slight aiming errors or fast target movement.
For trap and field and game shooting, where targets are launched farther away, a modified choke or an improved modified choke offers the best performance. These chokes tighten the shot pattern just enough to improve accuracy at longer distances without sacrificing the shooter’s ability to hit fast-moving targets.
Using the right choke for the specific shooting situation improves your consistency and helps increase your overall score in competitive shooting events.
How to Test Your Shotgun Choke Pattern for Accuracy
The only way to know for sure whether you’ve chosen the right shotgun choke is to test it by shooting at a pattern board. A pattern board allows you to visualize how the pellets spread and evaluate the percentage of shot inside the target area.
Start by shooting paper at 30metersor 40 meters with the choke and shotgun shell combination you plan to use. Look for holes in the pattern and assess whether the shot density is evenly distributed or whether some areas are lacking pellets. The ideal pattern will have the majority of the pellets hitting within a 30-inch circle, with no large gaps that would allow your target to escape.
If your pattern is too spread out, you might want to switch to a tighter choke. If it’s too tight, you may consider an open choke, such as a skeet or cylinder choke. Testing your shotgun’s choke pattern is an essential part of ensuring accuracy in the field or at the range.
What Is Choke Constriction and Why Does It Matter?
Choke constriction refers to the degree of narrowing at the end of the barrel. This constriction determines how the shot spreads once it leaves the muzzle, impacting both the accuracy and effective range of the shotgun.
A full choke, for example, has the tightest constriction, which keeps the shot pattern dense, making it ideal for long-range shooting at 40 meters or more. In contrast, a cylinder choke offers no constriction, allowing the shot to spread out quickly, making it perfect for close range shooting at 25 meters or less.
Understanding choke constriction is vital because the wrong amount of choke can either cause the shot to spread too thin or keep it too tight, both of which can result in missed targets. By selecting the appropriate choke tube, you ensure the pellets remain tightly grouped enough to hit the target without creating gaps or overshooting it.
Why Screw in Chokes Are a Game Changer
Screw in chokes have revolutionised the way shotguns are used, offering incredible versatility by allowing shooters to swap out chokes depending on the situation. Whether you’re preparing for a day of hunting, practicing at the range, or shooting in a competition, the ability to quickly switch between a full choke for long range shots or a cylinder choke for short range engagements enhances the shotgun’s performance.
Most shotgun manufacturers now offer a variety of screw in choke tubes designed to fit different shotgun models. These chokes can be easily replaced with minimal tools, giving you the flexibility to adapt your choke selection for each shooting session.
Tips for Improving Your Shooting with the Right Choke
Here are some actionable tips to help you improve your shooting performance with the right shotgun choke:
Match Your Choke to the Distance: For long range shots, use a full choke to keep your shot tightly grouped. For shorter distances, switch to an improved cylinder choke or cylinder choke to maximize the spread of shot.
Use a Pattern Board: Testing your choke on a pattern board at 30metersor 40 meters will give you a clear idea of how your shot spreads and whether the choke selection is appropriate for your needs.
Select Chokes Based on the Game: For larger game or waterfowl, use a full choke to ensure the pellets remain tightly packed for a clean hit. For smaller birds or fast moving targets, an improved cylinder choke will provide better coverage with a wider spread.
Key Takeaways for Choosing the Right Shotgun Choke
Choke tubes control the spread of shot and can dramatically affect your shooting accuracy.
A full choke is best for long-range shooting, while a cylinder choke is ideal for short-range targets.
Use a pattern board to test your choke’s performance at various distances.
Screw in chokes offer flexibility and allow for quick adjustments based on shooting conditions.
Always match your choke to the type of game or target you’re shooting for optimal performance.
Beretta Choke Families
Mobilchoke
Introduced in the mid 1980’s the Mobilchoke tube system was first available for the model S687L over and under and later carried through virtually every model of fixed breech and semi-automatic shotgun. At this time the Mobilechoke is the only choke tube system adapted by Beretta to 12, 20, 28 gauge and .410. The Mobilchoke system continues to be the mainstay of the 680 series field grade over and under shotguns.
The conical parallel design of the Beretta choke tubes creates a more gradual taper inside the choke tube which gently transitions into a parallel section that runs to the muzzle end of the tube. The conical parallel design results in reduced shot deformation, improved pattern uniformity and increased pattern density.
Identification Features:
The following pertains specifically to 12 gauge Mobilchoke tubes. While the dimensions noted will vary for the Mobilchokes in 20 gauge, 28 gauge and .410 gauge tubes, identification is very much self evident.
Barrels that use the Mobilchoke will typically be marked only with the gauge marking.
Mobilchoke choke tubes will be marked PB or ST andthe degree of choke. If the choke tube is steel shot compatible it will also be marked SP.
The start of the threaded portion of the 12 gauge Mobilchoke tube is located a nominal 41.5 mm (1.63 inch) from the breech end of the choke tube.
The length of the threaded portion is a nominal 9.15 mm (.360 inch).
The major diameter of the choke tube thread is 20.62 mm (.811 inch).
Optima-Choke
In the year 2000 Beretta introduced the 12-gauge Optima-Bore barrel design into some of our competition shotguns. This new barrel utilized a larger internal bore dimension known to some as “back-boring” and required a new choke tube design to give the proper constrictions. The Optima barrels can be identified by locating the letters “OB” stamped next to the barrel gauge stamp. Barrels marked with the “OB” stamp will use the Optima-Choke system. This design features a longer internal transition taper into the choke constriction, making the overall length of this tube longer than the original Mobilchoke tube.
Identification Features:
Barrels that use the Optima-Choke will typically be marked OB immediately adjacent to the gauge marking.
Optima-Choke choke tubes will be marked Optima-Choke.
The start of the threaded portion of the Optima-Choketube is located a nominal 50.78 mm (2.00 inch) from the breech end of the choke tube.
The length of the threaded portion is a nominal 15.9 mm (.625 inch).
The major diameter of the choke tube thread is 20 mm (.787 inch).
At this time the Optima-Bore/Optima-Choke system is typically used on competition 391 series semi-automatic, older680 series over and under shotguns and some other Semi-automatic guns.
Optima-Choke Plus
With the introduction of the model 391 Xtrema shotguns in 2003 the Optima barrel configuration was added into the 391 12-gauge line of field shotguns. In order to handle a higher volume of steel shot shells used in field hunting, the Optima-Choke tube was revised and manufactured with a thicker wall size. This revised choke tube was named the Optima-Choke Plus and featured the same Optima-Choke internal dimensions and performance but has a larger outside diameter and revised thread location.
Identification Features:
Barrels that use the Optima-Choke Plus will typically be marked 12 gauge 3 1/2″ with no other identifying code mark in the immediate area of the gauge marking
Optima-Choke Plus choke tubes will be marked Optima-Choke-Plus.
The start of the threaded portion of the Optima-Choke Plus tube is located a nominal 41.9mm (1.64 inch) from the breech end of the choke tube.
The length of the threaded portion is a nominal 10 mm (.394 inch).
The major diameter of the choke tube thread is 20.58 mm (.810 inch).
At this time the Optima-Choke Plus system is typically used on the Xtrema, Xtrema2 semi-automatic field guns and 471 Silver Hawk side by side shotguns (12 Ga.).
Optima-Choke High Performance (Optima-Choke HP)
With the introduction of the SV-10 Perennia and Prevail series over and under shotguns in 2008 a third Optima-Bore choke configuration was added, the Optima-Choke HP. As noted above under the Optima-Choke Plus section, the extended use of high performance steel and metal alloy non-toxic shot imparts considerable stresses. In the case of the Optima-Choke Plus part of the solution was to use a choke tube design offering a thicker choke tube wall to better resist these forces. This in turn results in a heavier, larger diameter barrel.
One of the principal objectives in designing the Optima-Choke HP (OB HP) system was to develop a choke tube system that would withstand the rigors of the extended use of heavy payloads of steel/metal alloy shot while being able to retain the weight saving and handling characteristics of the lighter Optima-Choke barrel contour. To accomplish this Beretta engineers designed a choke system locating the threaded portion of tube a nominal 10 mm (.394 inch) further to the rear of the muzzle end of the tube then found on the Optima-Choke system. This effectively created an increase in wall thickness at the muzzle end of the choke tube where the greatest degree of choke constriction typically occurs and stresses are the highest without having to use the larger barrel contour.
Identification Features:
Barrels that use the Optima-Choke HP will be marked OB HP immediately adjacent to the gauge marking.
Optima-Choke HP choke tubes will be marked Optima-Choke-HP.
The start of the threaded portion of the Optima-Choke-HP tube is located a nominal 40 mm (1.57 inch) from the breech end of the choke tube.
The length of the threaded portion is a nominal 19 mm (.748 inch).
The major diameter of the choke tube thread is 20 mm (.787 inch).
At this time the Optima-Choke HP system is typically used on most modern current model O/U Beretta’s including the 680series,690 series, DT11 and Ultraleggero as well asA400 Xplor Action and Xtreme Plus semi-automatic shotguns.
Choosing the correct choke is not only important for accuracy, but also for safety.
Choosing the correct shotgun choke isn’t just about performance, it’s a safety issue. A choke too tight for a given load, especially certain slugs or steel shot, can spike chamber pressure and risk damaging or bursting the barrel. The wrong choke can also throw a pattern too wide or too tight, raising the chance of a stray pellet strike. Always match your ammunition to your choke’s rating, and when unsure, check the manual or ask a professional before firing.
Furthermore, it’s essential to fit the right model choke (e.g. Optima, Optima HP) to your shotgun, fitting the wrong choke will almost guarantee barrel destruction which is a failure not covered by warranty. If you are unsure about the right choke for your gun, please contact Beretta Australia.
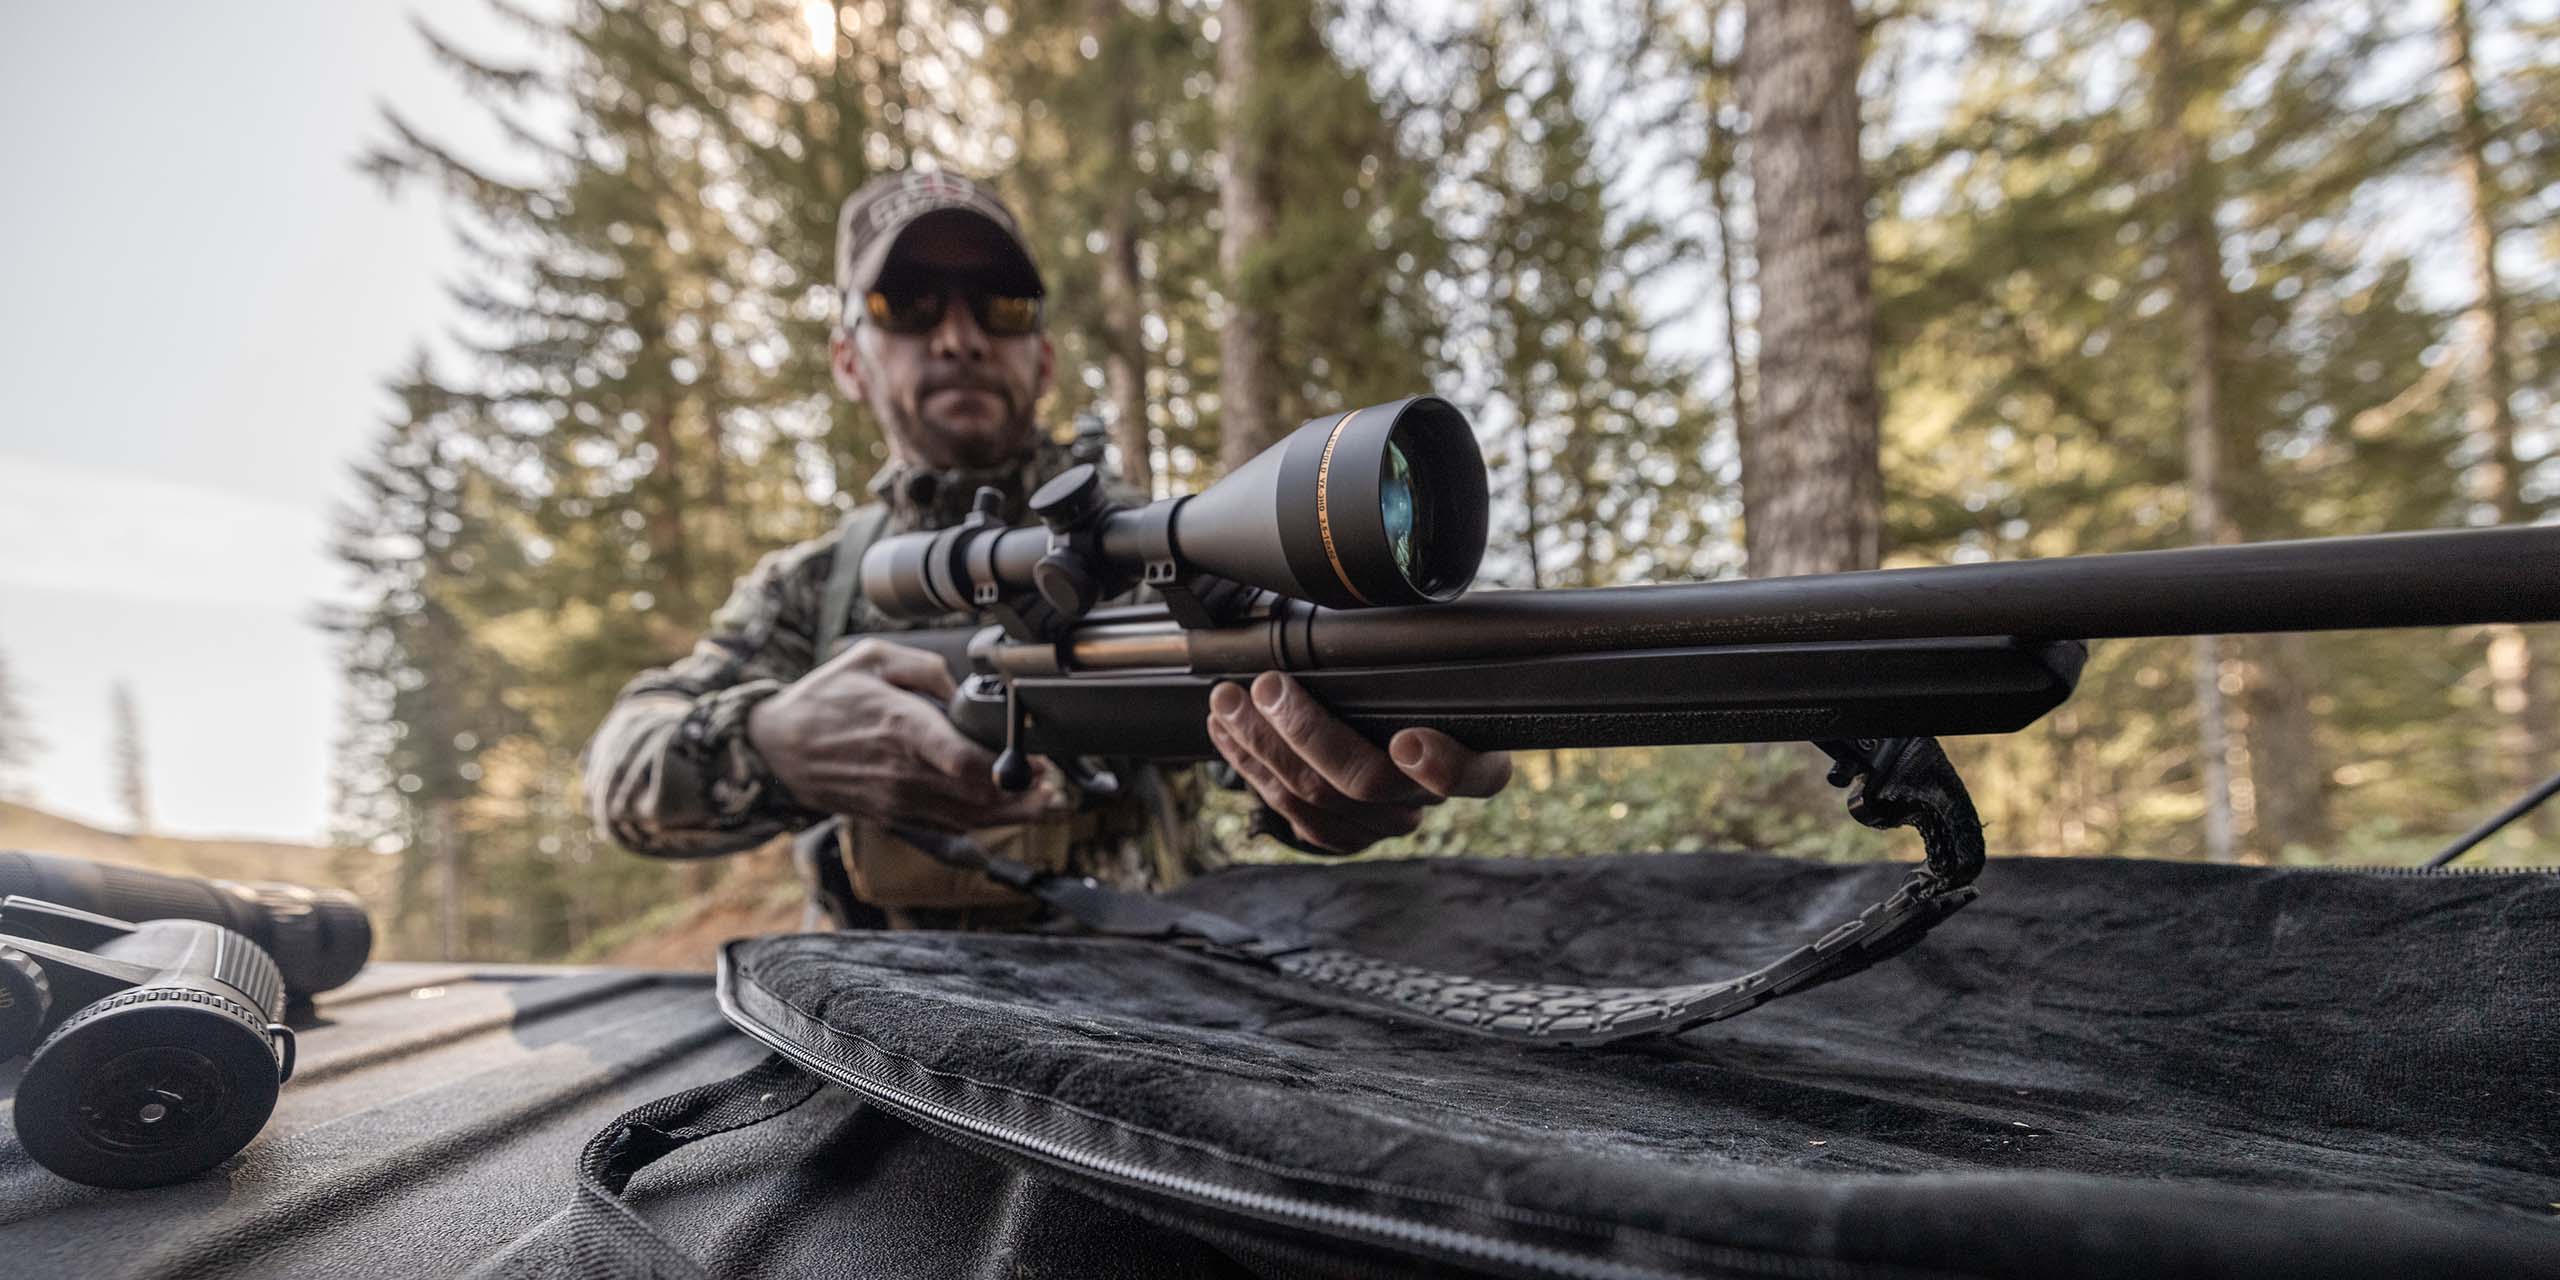
A lot of numbers get thrown around when people talk riflescopes. You’ll hear phrases like “three to nine” and “five to one.” But if you’re new to hunting or shooting, you may be wondering what those figures mean. Fortunately, the key to that code is etched right into your new Leupold optic. In this article, we will break down what all those numbers on your riflescope represent.
Zoom Ratio
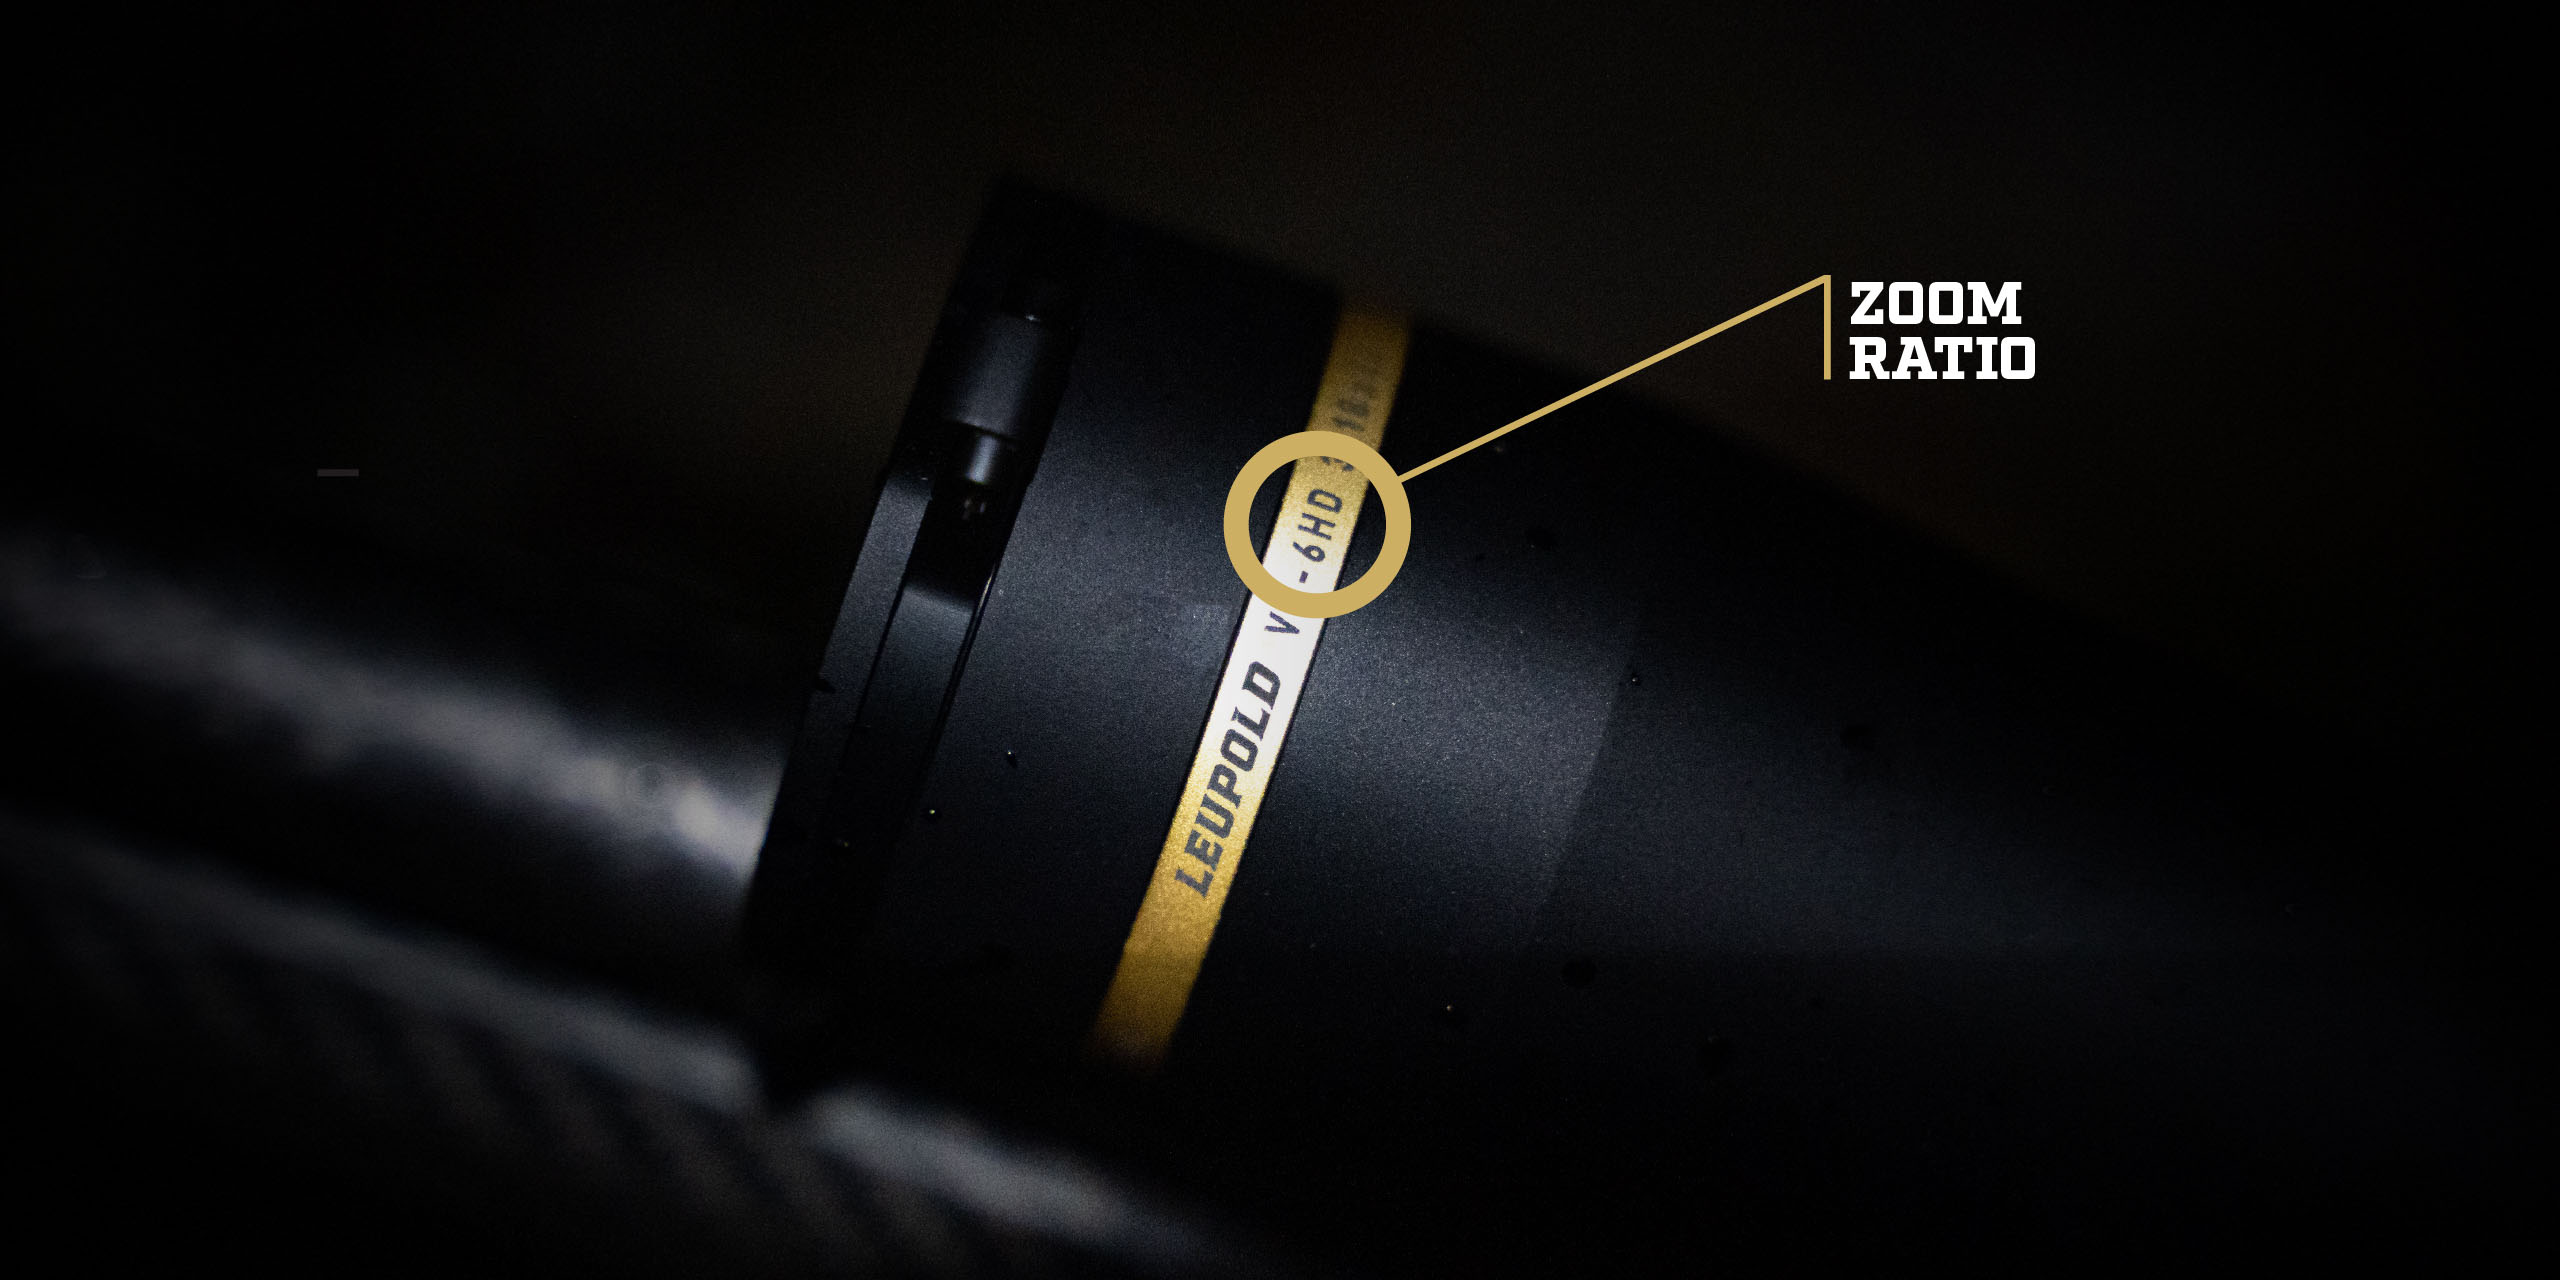
If you’re unfamiliar with the term zoom ratio, it’s simply the relationship between an optic’s magnification values. Have a look at the objective end of your scope, and you’ll see a black or gold ring with a short list of information on it. The first number on that list is usually attached to a series name, such as the 6 in VX-6HD (shown above).
At Leupold, we use this model number as a quick way to identify your scope’s zoom ratio. In this example, the VX-6HD is built around a 6:1 zoom ratio meaning its top-end magnification will always be six times greater than its low-end magnification.
A VX-5HD or Mark 5HD riflescope, for example, are built around a 5:1 zoom ratio. While our VX-3HD and Mark 3HD are built on a 3:1 zoom ratio. So if you’re ever curious what your zoom ratio is, just refer to the model name on your scope.
(The only model this doesn’t hold true is in the VX-Freedom series. Scopes in that series have a 3:1 zoom ratio, but there isn’t a number in their name to help you figure that out.)
Magnification Range
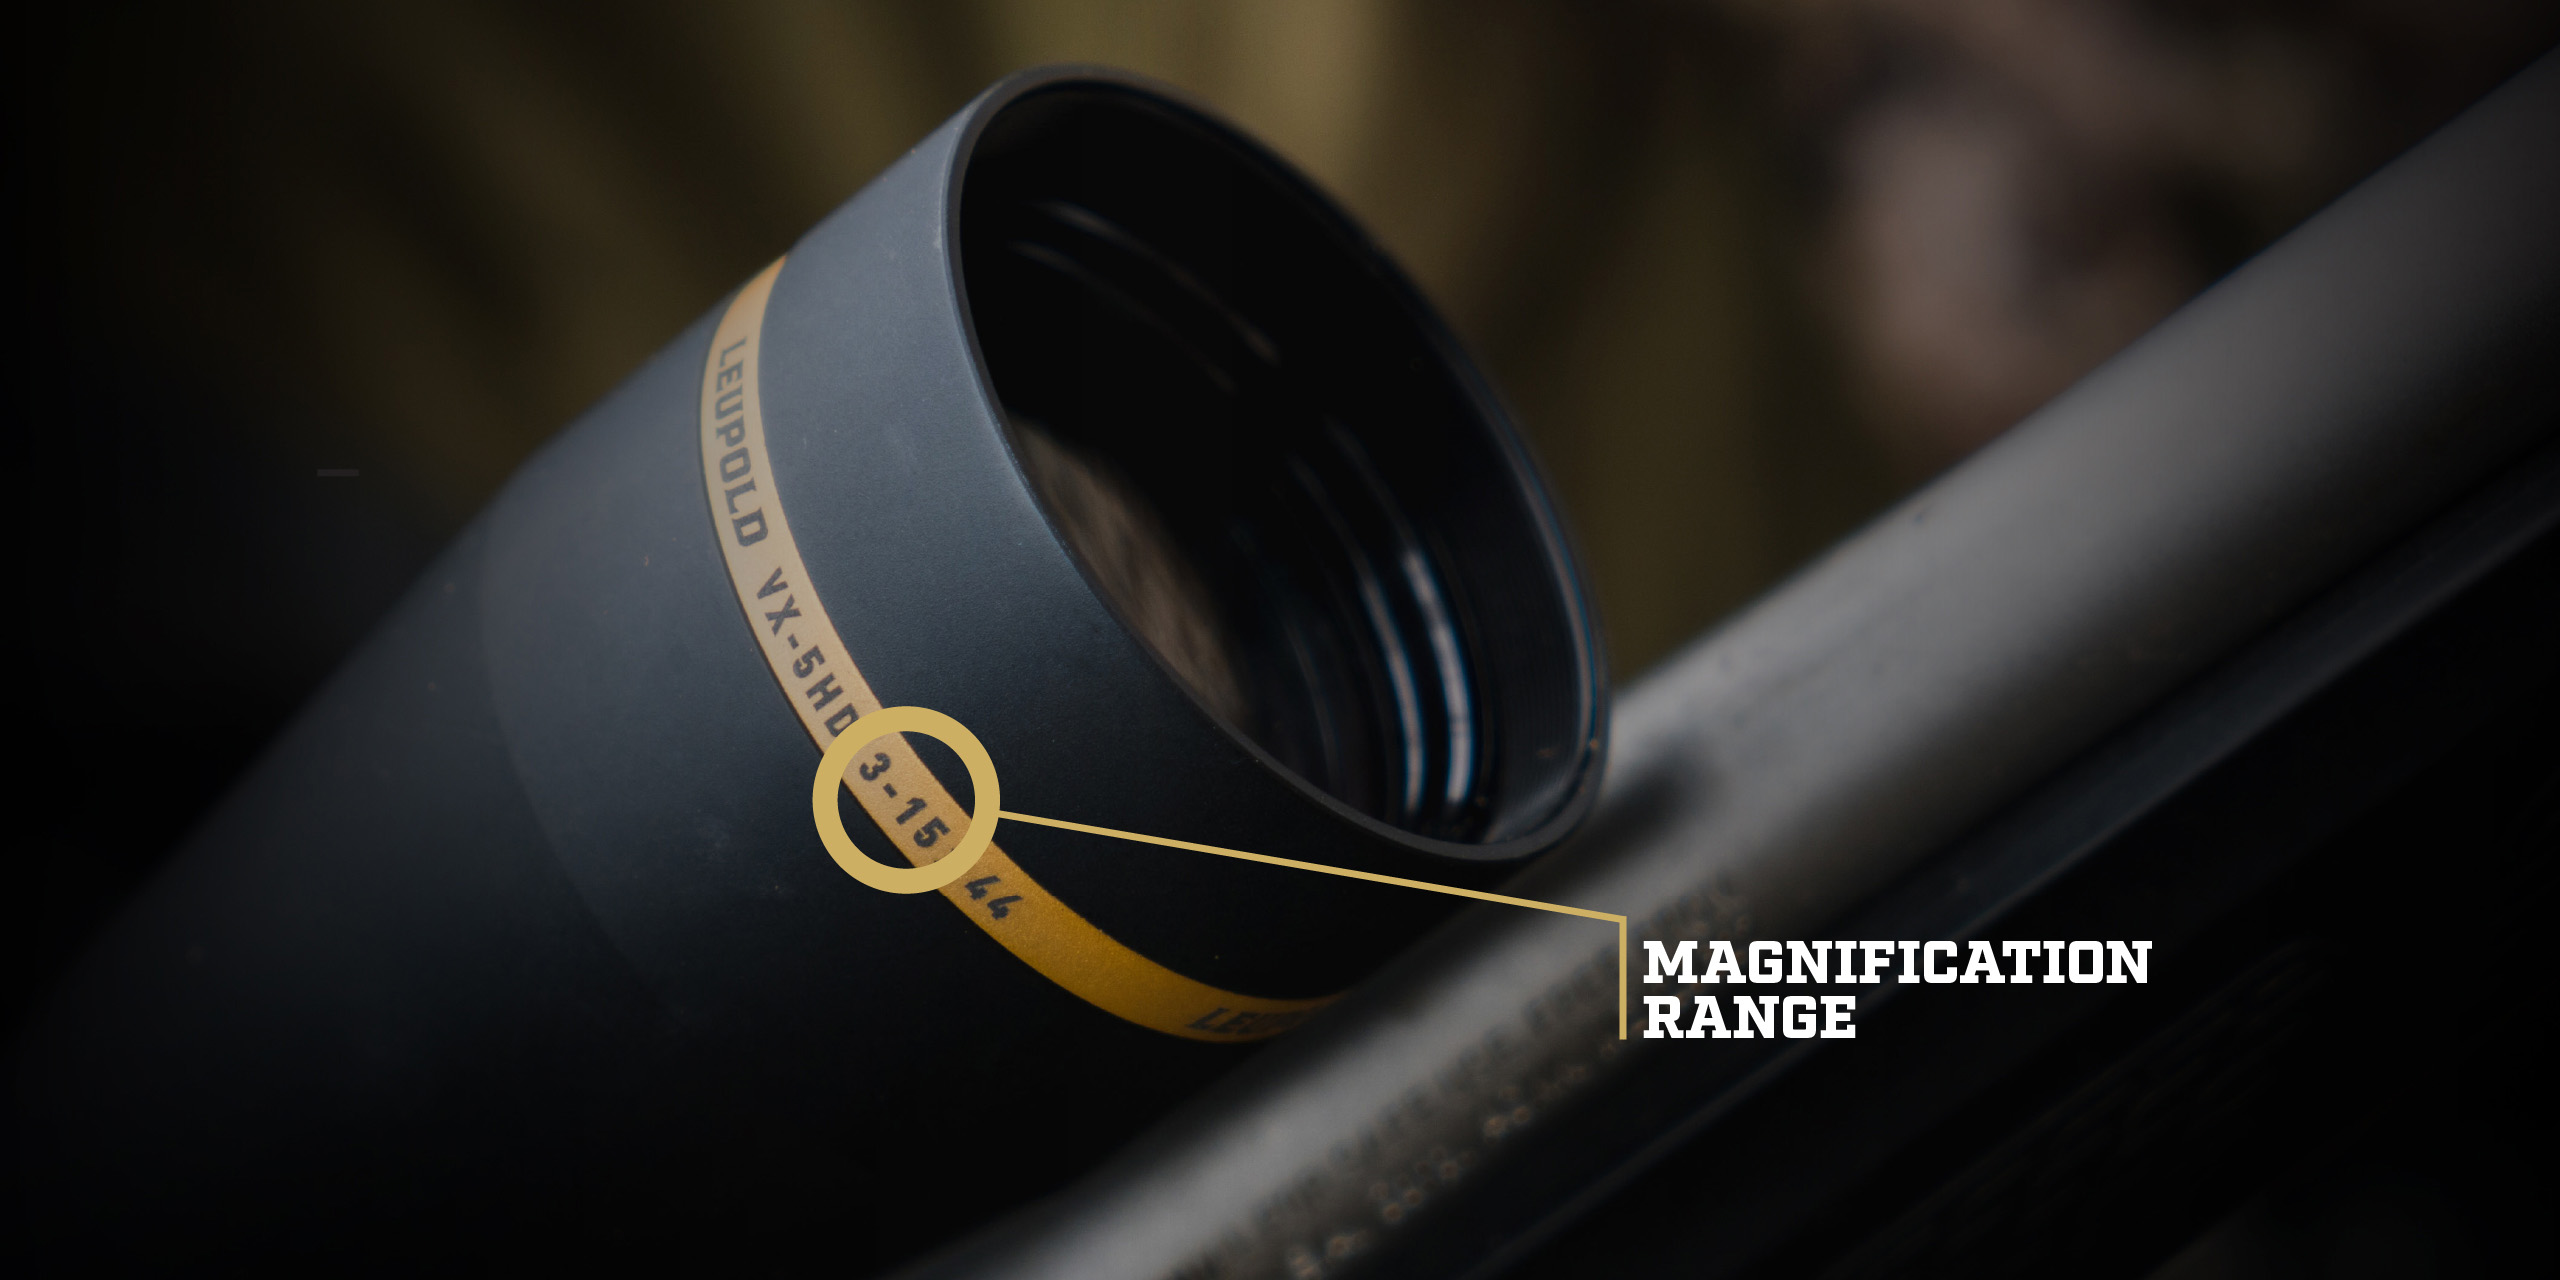
The numbers listed after the series name indicate your scope’s magnification range. These numbers vary from model to model, but remember, the zoom ratio will always dictate their limits. In the case of a VX-5HD (which has a 5:1 zoom ratio), its magnification offerings include: 1-5, 2-10, 3-15. 4-20, or 7-35. The first number represents the lowest optical magnification, while the higher number represents the max magnification.
For example, in the VX-5HD 3-15 shown above, your lowest setting magnification setting available is x3 power. But using your power-selector, you can also magnify your image up to x15 power. And while that is a bit of a condensed explanation, our Magnification 101 article will fill in the gaps if you’re interested in learning more.
Objective Lens
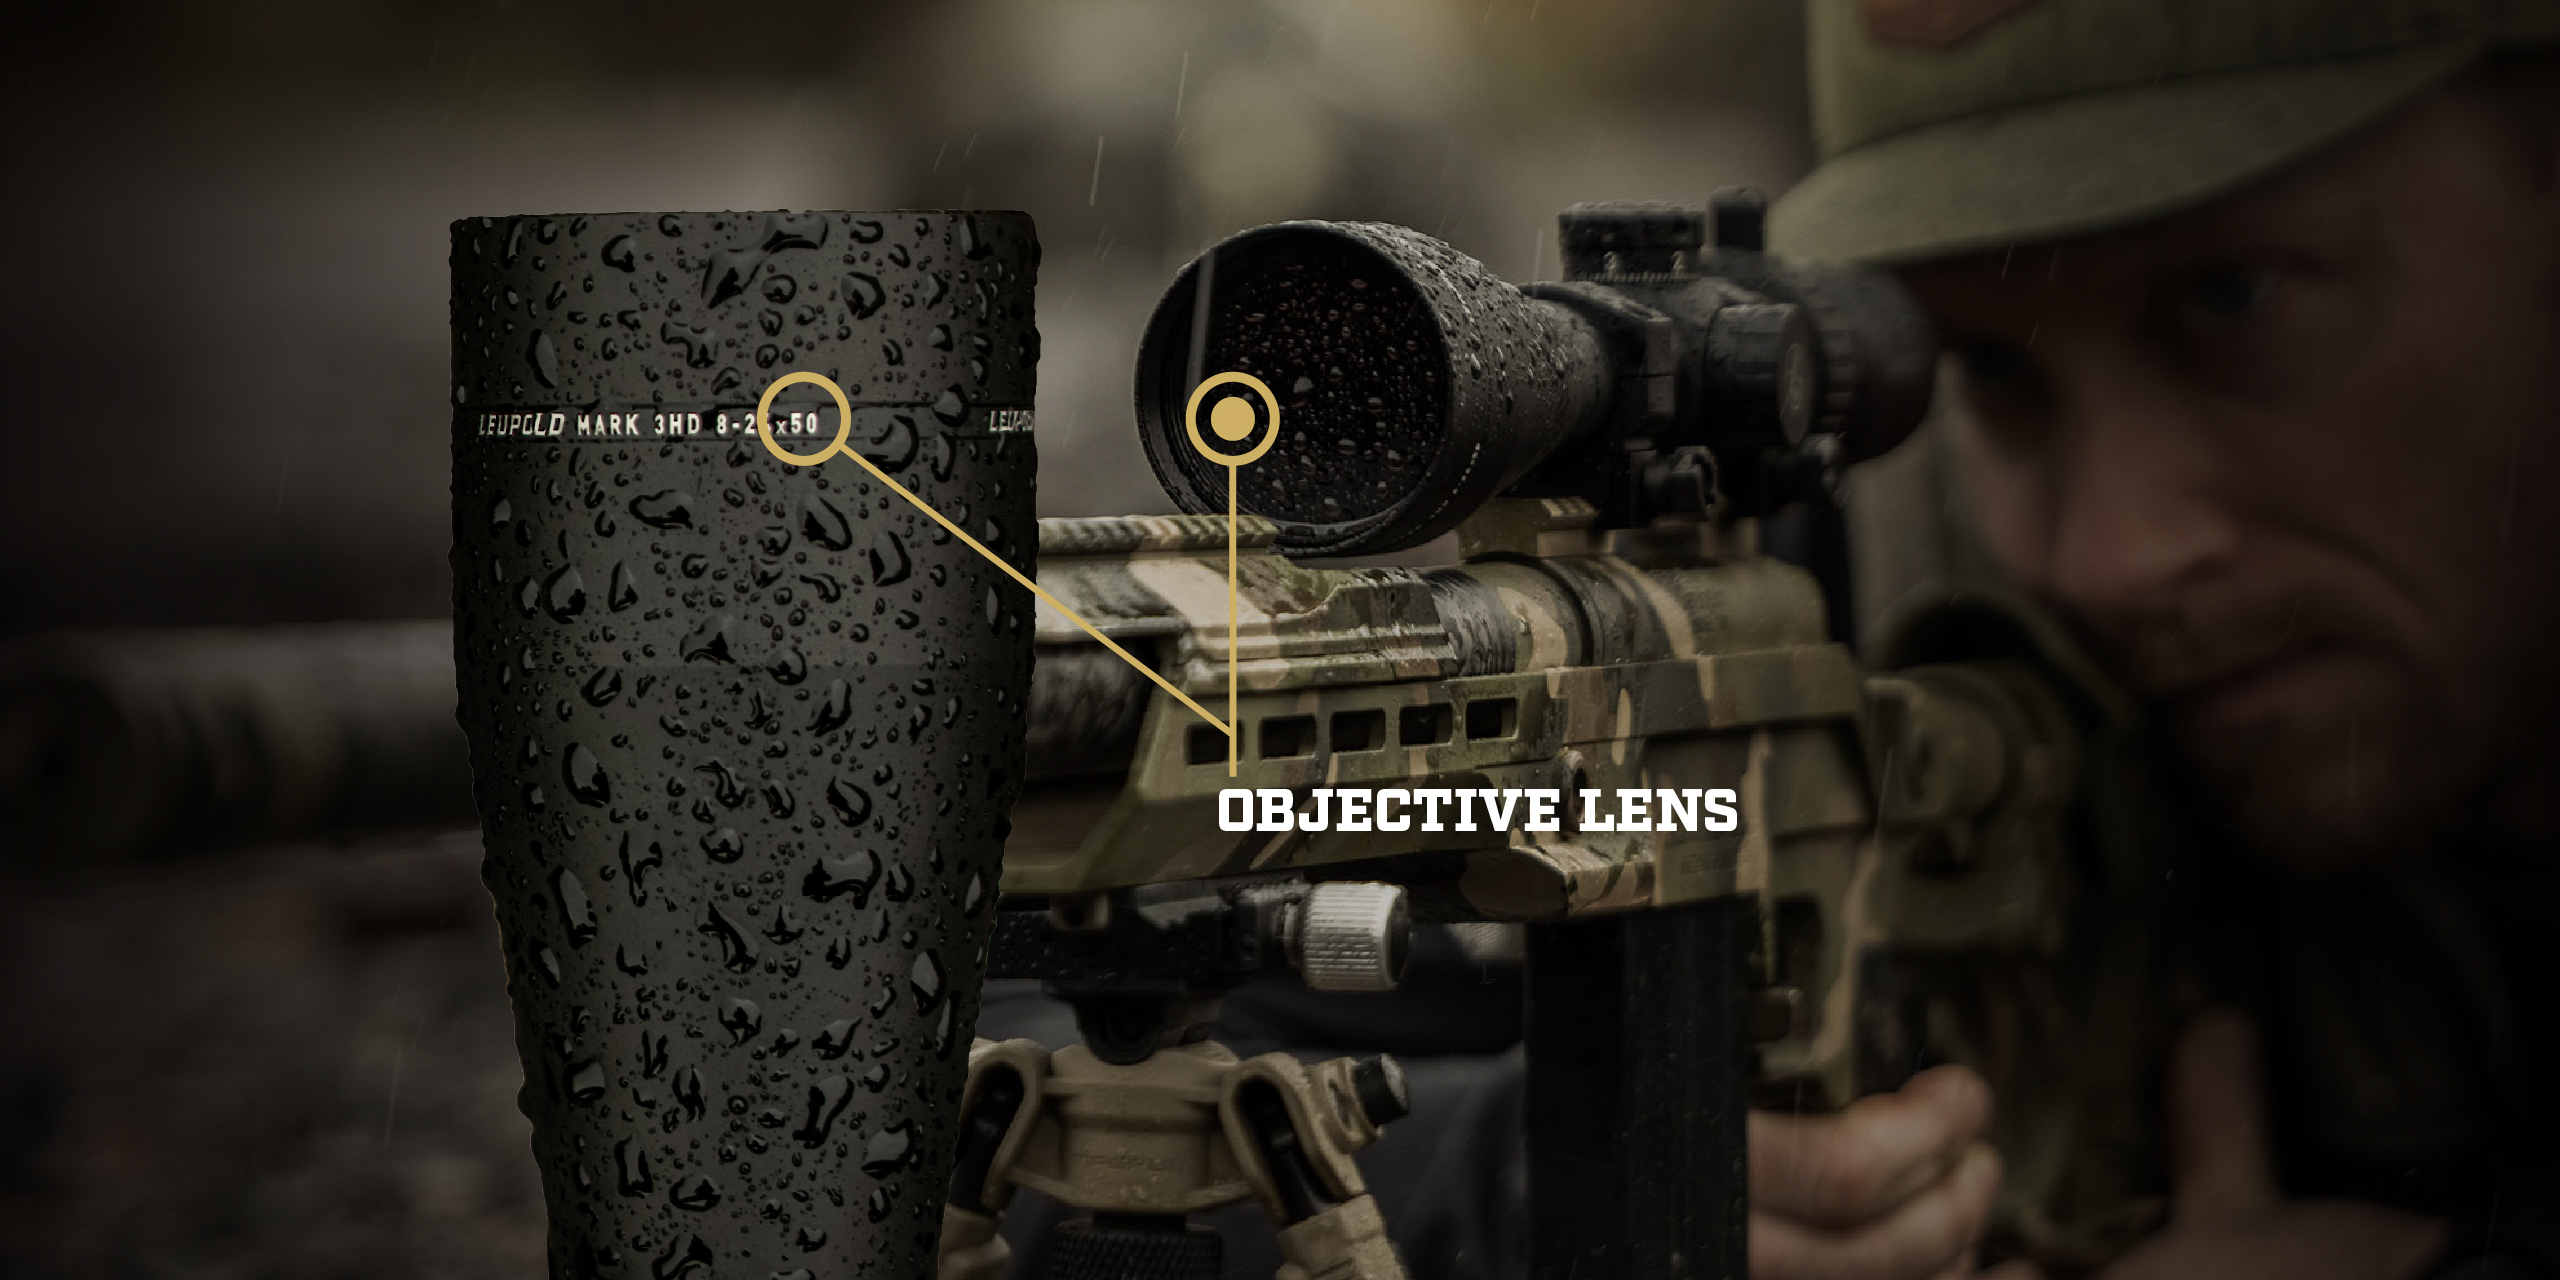
The objective lens is located nearest the objects being viewed, and its diameter in millimeters is the last number listed on your scope. In the example above, the objective lens of the Mark 3HD is 50mm. Larger objective lenses allow more light to enter an optic, making them extremely popular among hunters and shooters who want the brightest image possible in low-light situations. But there are plenty of options when it comes to objective lens sizes, and they all collect tons of light. Objective lens sizes can range from 32mm all the way up to 56mm. The last thing to keep in mind is that a larger objective lens means you may need taller mounts to avoid your optic touching the rifle. You can use ourmount finder toolto get a recommendation for your specific setup.
Elevation, Windage, and Parallax Adjustments
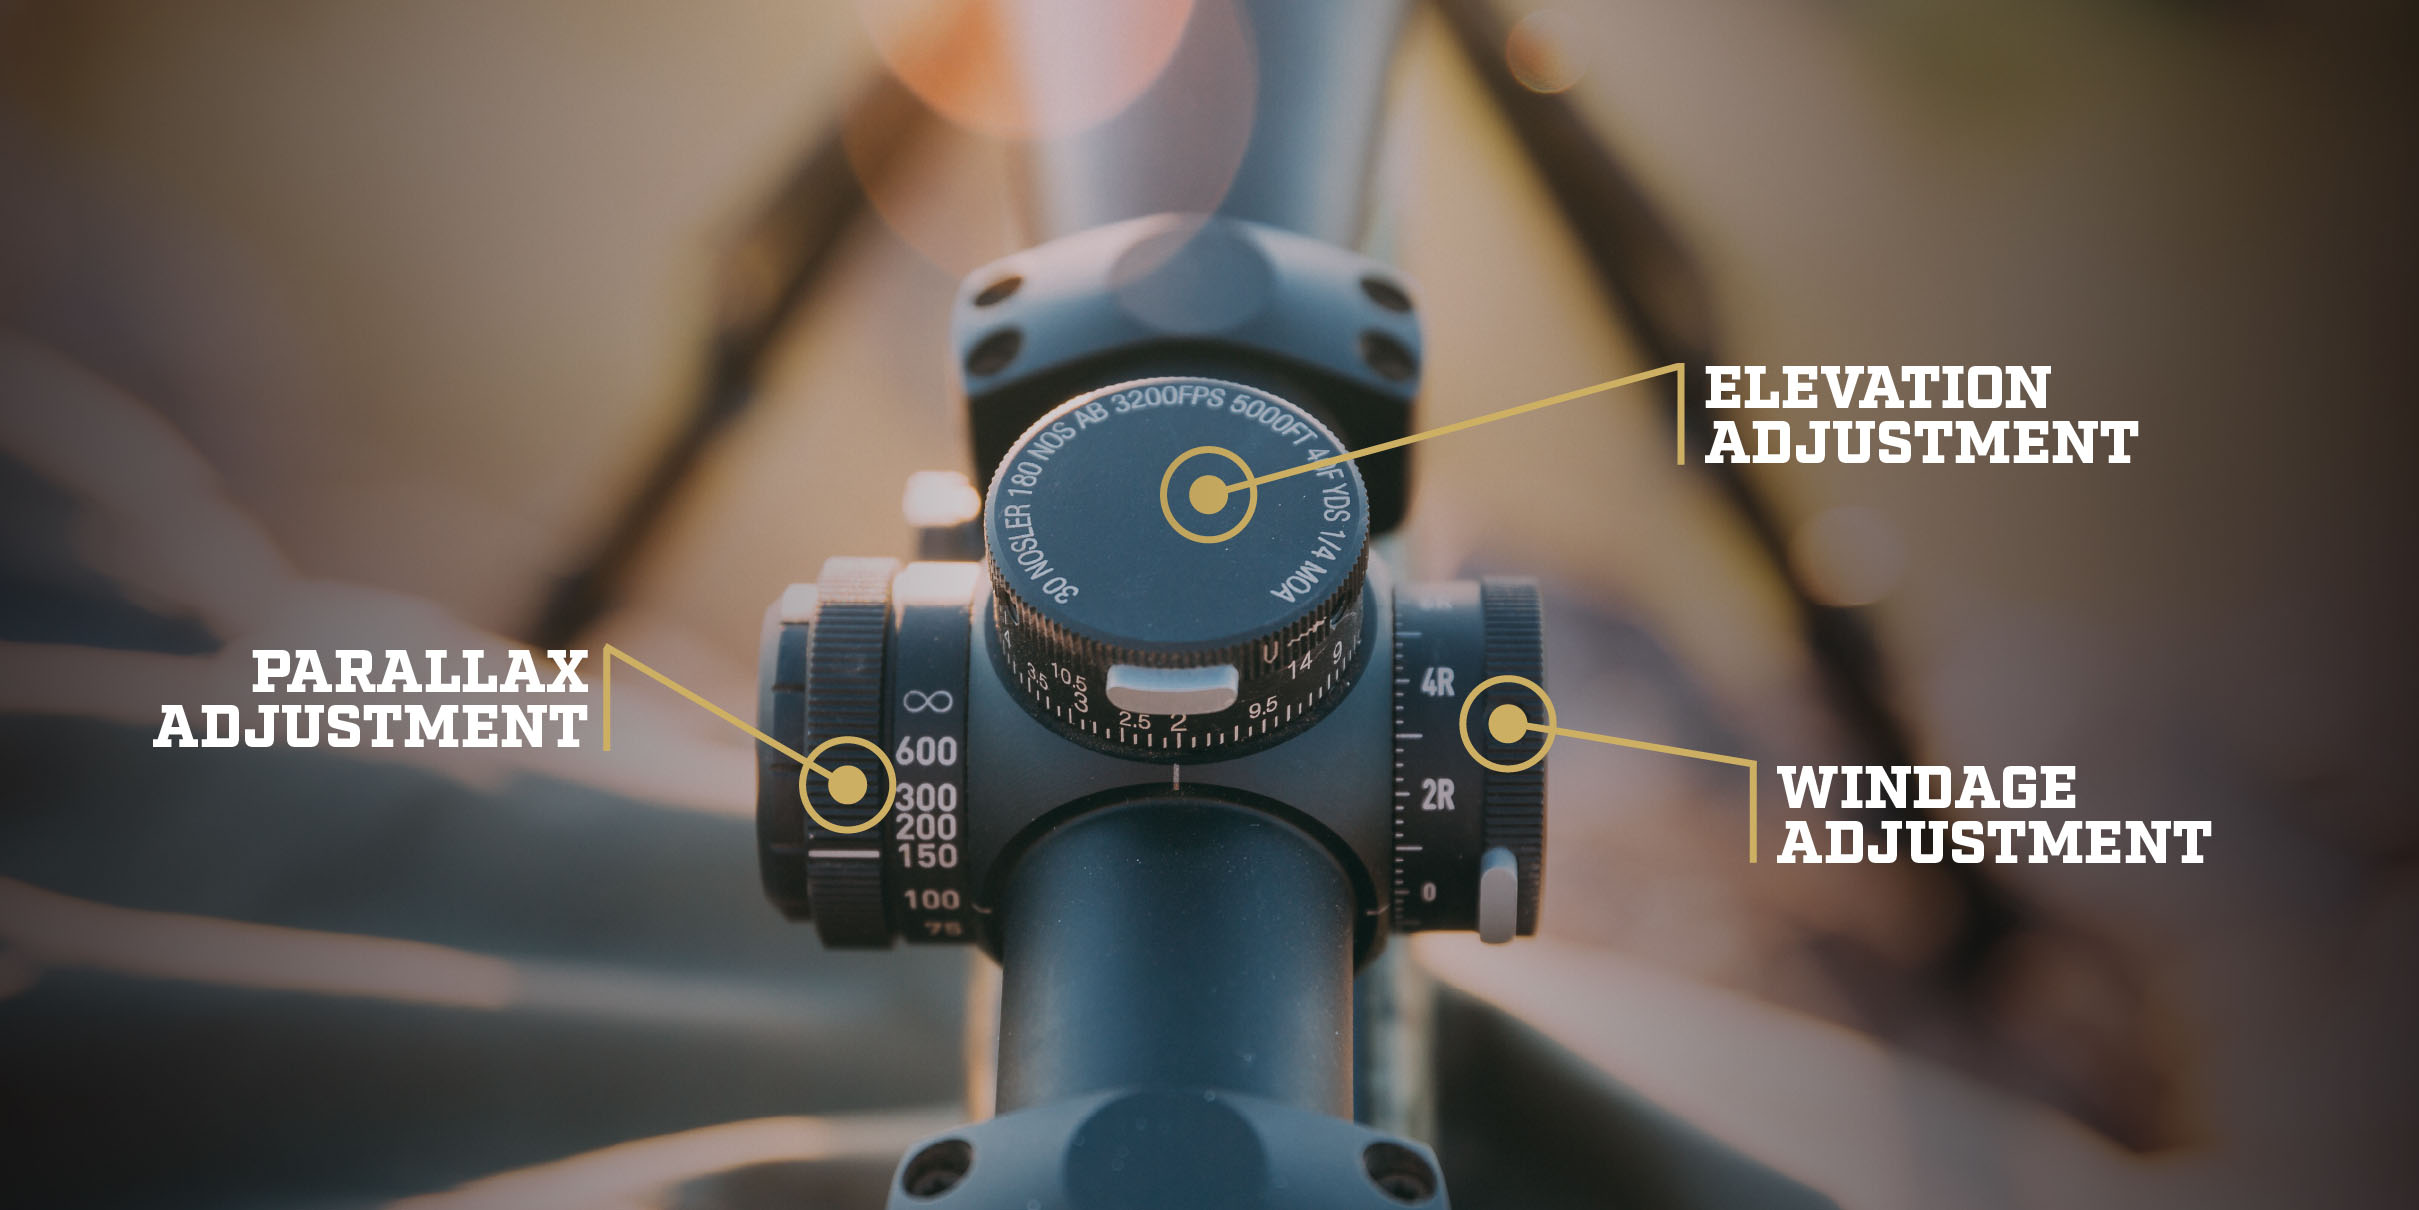
The elevation and windage dials are two more places aside from the bell and power selector where you’ll find etched-in numbers. The top turret is the elevation dial, and the windage dial is on the right; These are the areas you’ll want to focus on when you’resighting in your scope. As far as those numbers go, they’ll either be represented in MOA or MILs. MOA, which stands for Minute of Angle, is the measurement system favored by American hunters, while MILs is the abbreviation for milliradians. Armed forces generally prefer to use MILs, but both units of measurement work equally well for most applications.
Alternatively, every CDS® (Custom Dial System) compatible scope is eligible to redeem one free custom dial. A CDS dial simplifies your shooting process by customizing the markings on your elevation dial from MOA or MILS to yards for your specific setup. You canlearn more about CDSandorder your custom dial here.
--
The parallax adjustment (also called side focus) is the last spot on your riflescope where there might be numbers. If your riflescope has one, it’ll be opposite the windage dial. This adjustment knob allows you to account for parallax by tweaking the position of the objective lens assembly, bringing objects into focus while stabilizing your reticle. But what is parallax? In short, it’s an optical illusion that occurs when your target and reticle are on different focal planes. You can see it in action by moving your head around while looking through your scope. As soon as you change your viewing angle, the reticle will appear to move or swim around.
For most people, especially hunters, parallax isn’t something worth stressing over. But if you’re a long-range precision shooter who needs bullet-on-bullet accuracy, a parallax adjustment is a must-have addition that’ll help you tighten your groups. Just zoom in on a target to whatever magnification you’re comfortable with, then turn the dial until you get a crisp picture and a reticle that stays put.
--
Now you should have a good understanding of all the numbers on your new Leupold riflescope. So, the next time you hear someone refer to their optic as a "three-to-fifteen by forty-four with a CDS dial and a side focus parallax adjustment," you’ll know exactly what they mean.Welcome to the club.
For outdoor enthusiasts, hunters, and tactical professionals, navigating the world of advanced optics can be daunting. Two of the most popular technologies used for low-light and no-light environments are night vision and thermal imaging. Each has unique strengths, operational differences, and ideal use cases, but understanding their distinctions can guide users to the right choice for their specific needs.
The Technology Behind the Tools
Night Vision: Night vision devices amplify ambient light, such as starlight or moonlight, to create an image. These devices rely on an image intensifier tube, which collects light and converts photons into electrons, amplifying them to produce a visible image. This process creates the classic green or black-and-white visuals commonly associated with night vision goggles and scopes.
Thermal Imaging: Thermal optics, on the other hand, detect heat rather than light. All objects emit infrared radiation, with hotter objects emitting more. Thermal devices use sensors to capture this radiation and convert it into a heat map or image, distinguishing targets based on their temperature relative to their surroundings. This technology does not require ambient light, making it highly effective in complete darkness.
Key Differences Between Night Vision and Thermal Imaging
Performance in Lighting Conditions
Night Vision: Requires some level of ambient light to function. While effective in low-light environments, performance diminishes in complete darkness or during overcast nights. Artificial light sources, such as infrared illuminators, can enhance visibility, but they can also give away the user’s position if opposing forces or hunted animals can see infrared light.
Thermal Imaging: Operates independently of light, excelling in total darkness, dense fog, or thick vegetation where light amplification is insufficient.
Target Identification
Night Vision: Offers high-resolution imagery, making it easier to identify facial features, clothing, or subtle movements. This makes night vision a strong choice for applications requiring detailed observation. However, its range is often limited by the availability of ambient light, usually maxing out at an average of 300 yards.
Thermal Imaging: Highlights heat sources but lacks the finer details. While it’s excellent for detecting animals or people, the inability to see defining features may make identification more challenging at close ranges.
Environmental Adaptability
Night Vision: Struggles in environments with excessive ambient light, such as urban settings, where streetlights or headlights can cause glare and wash out the image. Additionally, heavy fog, rain, or smoke can obstruct performance.
Thermal Imaging: Excels in obscured environments like smoke, light fog, or rain, as heat signatures are not affected by visual obstructions. However, extreme heat or reflective surfaces, such as water or metal, can interfere with thermal accuracy.
Cost and Accessibility
Night Vision: Generally more affordable and widely available. It is often the entry point for those new to low-light optics and is frequently used by hobbyists, security professionals, and hunters.
Thermal Imaging: Typically more expensive due to the advanced sensors and processing technology required. Its cost reflects its versatility and capability in adverse conditions.
Choosing the Right Tool for the Job
When deciding between night vision and thermal optics, consider your primary use case. For hunters seeking to track game hidden in dense brush, thermal imaging offers a significant advantage due to its ability to easily distinguish between living things and foliage, defeating natural camouflage. For users needing detailed observation at relatively close range or working in environments with some ambient light, night vision remains a practical choice.
At Pulsar, we’re dedicated to equipping outdoor enthusiasts and professionals with cutting-edge optics designed for diverse applications. Whether you need monoculars, riflescopes, clip-ons, or binoculars, Pulsar provides advanced solutions for all your low-light vision needs.
The fit of a shotgun is just as important as the ammunition you choose. Shooters spend hours debating choke selection and load, and almost no time thinking about whether the gun actually fits them.
That matters. No matter how good your technique is, a gun that doesn’t fit you will cost you on the range and in the field. Fit is the foundation everything else is built on.
With over 500 years of firearms expertise behind us, we know that a correctly fitted shotgun isn’t a luxury reserved for competitive shooters. It’s where every shooter should start. Here’s how we approach it.
The Four Areas That Matter
When we talk about gun fit, there are 3 places where the gun connects with your body on your shooting side: into the shoulder, into the face, and at the grip. Get those 3 areas right for your build and your shooting style, and the gun becomes an extension of you. Get them wrong, and no amount of practice fully compensates.
A gun set up for field or sporting clays is not the same as one set up for trap shooting. The way you mount, the speed you shoot, the clothing you’re wearing: all of it feeds into how the gun should be configured. When you shoulder the gun and look down the rib, most shooters want to see a consistent site XXXX with a slight awareness of the rib itself. If you’re seeing too much rib or almost none at all, that’s telling you something about comb height before a fitter even gets involved.
Weight and balance also play a role that’s often underestimated. Two guns with identical stock dimensions can feel completely different in the hand and at the shoulder depending on where the weight sits. A heavier gun will swing differently, affect your technique, and change how the recoil is displaced. It’s part of why fit isn’t just about measurements. It’s about how the whole package works for you.
Into the Shoulder: The Butt Plate
The butt plate is where fit starts. The primary concern here is comfort and contact, specifically achieving full, even contact across the shoulder pocket every time you mount.
What you’re working to avoid is the toe or the heel of the stock digging in. If either end of the butt plate isn’t making proper contact with the shoulder, that’s where the recoil will focus, and that’s where bruising and discomfort will come from over time. Full shoulder contact spreads the load evenly and protects the shooter.
Two dimensions determine how well this works:pitch(the angle of the butt plate relative to the barrel) and the overall geometry of the toe and heel. Correct pitch for your build means the entire pad face sits flat against the shoulder, not tilted so one edge bites in.
Check Position
Once the butt is in the shoulder, the stock needs to come up to the same point on your face every time. This is controlled by three things: the height of the comb and the cast of the stock/pitch.
The comb is the top of the stock where your cheek rests. Its height controls how high your eye sits above the rib. Too low, and your eye drops below the sighting plane and the gun shoots low. Too high, and the opposite happens. Either way, the shooter ends up making unconscious adjustments to their mount to compensate, which means the mount is never the same twice.
Cast is the lateral dimention in the stock, moving it away from the centreline of the action. For a right-handed shooter, cast off moves the stock to the right; for a left-handed shooter, cast on moves it to the left. The goal is simple: when the gun comes up to your face naturally, your dominant eye should be sitting directly over the centre of the action and looking straight down the rib. Without the right cast for your build, you’ll find yourself rolling your face across the comb to find that line, which introduces inconsistency on every shot.
Cast also applies to the toe of the stock and how it sits in relation to the shoulder. Getting the cast right for the face and the toe together is what gives you a gun that comes up to the same place, naturally, every time.
A simple way to check this yourself: mount the gun with your eyes closed, shoulder it naturally, then open them. Where your eye lands tells you exactly what the stock is doing. If you’re consistently off-centre, the stock isn’t bringing you back to the same place. That’s a cast problem worth addressing.
Charlie Hudson Aiming Shotgun
Looking Down the Rib
In shotgun shooting, your dominant eye is the rear sight. The stock positions that eye, and everything else follows from it.
A correctly fitted gun, when mounted, should put your eye in a position where the sight picture you see is consistent and natural, not something you have to search for or adjust to. The moment you’re making conscious corrections to find your eye line, the gun is telling you something needs to change.
We also see this show up in pattern testing. If your technique is sound and you’re still consistently missing in one direction, check the comb before you change your choke. Nine times out of ten, the miss is coming from eye position, not the pattern.
This is where adjustable combs earn their place, modern Beretta and Benelli competition platforms include adjustable comb systems that let you dial in height and cast without custom woodwork. For shooters who are still finding their fit, or who move between disciplines, that adjustability is worth having. Changes can be made and tested without locking in permanent alterations.
The Grip and Forend
These two areas are the most overlooked parts of gun fit, and they matter more than most shooters realise.
The grip controls how consistently you hold the gun, how much lateral pressure you apply, and how much control you have over the gun’s movement through the swing. The size, radius, depth, and width of the grip all affect whether your hand is able to sit naturally in the same position every time. A grip that’s too straight, too pistol-grip, too wide, or too narrow for your hand will affect your swing and your consistency without you necessarily being able to identify why.
A simple way to find your natural grip radius: make a relaxed fist without the gun in your hand. That natural curve is what you’re looking for in a grip. If the gun forces your hand into a different shape, your hold will always carry a small amount of tension you won’t notice until you’re shooting a long day. (commented: keep this more about positioning, rather than eliminating)
Theforendfollows the same logic. Where your lead hand sits on the forend, and how it grips, influences how you push the gun through the target. If the forend doesn’t suit your hand or your hold, it introduces a variable into the swing that you’ll be managing shot to shot rather than eliminating.
If you’re having a custom stock built or significant work done, raise it with your fitter.
Length of Pull
Length of pull is the distance from the trigger to the recoil pad, and it affects your comfort, your neck and shoulder angle, and how cleanly you can mount the gun.
Too long and the mount becomes difficult, especially for shorter-armed shooters or those with less shoulder flexibility. Too short and the stock restricts your shooting position and drives harder into the shoulder on recoil.
A quick field check: with the gun mounted, your thumb should sit roughly a thumb’s width from the tip of your nose. It’s not a substitute for a proper fitting, but it will tell you quickly whether you’re in the right area.
Length of pull isn’t static. Your clothing changes it. A gun that mounts perfectly in a summer shirt can feel entirely different under a heavy jacket during late-season duck hunting. If you’re getting a fitting, it’s worth doing it in the clothing you actually intend to shoot in, or at minimum factoring your typical layering into the conversation with your fitter.
Fit Isn’t a One-Time Thing
Your body changes, and so does your fit.
Weight, posture, flexibility, and build all shift over time. A fitting that was correct five years ago may not be serving you as well today. We recommend revisiting your gun fit every couple of years. Not because something has gone wrong, but because staying ahead of those changes keeps your shooting where it should be. It’s a short session that pays back on every day you spend behind a gun.
Getting a Professional Fitting
A professional gun fitter isn’t just measuring you and making adjustments. They’re watching you shoot, observing how you mount, how you move, where your gun goes when it comes up naturally, and working from that picture, not just from a tape measure.
The Beretta Australia Gunsmith team has been leading the industry here for more than 20 years, operating out of our Melbourne head office. We offer a complimentary fitting service with every new Beretta, Benelli, and Franchi competition shotgun purchased through our authorised dealer network. Our team includes Sergei Yauhleuski, former Australian Olympic Team Gunsmith, whose stock work is regarded as among the best available in the country, as many of Australia’s top shooters will attest.
For most shooters, the standard fitting covers everything they need. If you require more detailed work, we also offer advanced services: comb height adjustment, length of pull modifications, recoil pad upgrades, and full adjustable stock installation. Most sessions run between one and one and a half hours.
Complimentary fittings are available with every new Beretta, Benelli, and Franchi competition shotgun purchased through our authorised dealer network. Those same brands are also covered by our Free Forever Servicing program: for the life of your gun, we’ll service it free of charge (parts and labour) at any event we attend with our team. We’re regularly at national and state championships and major shoots across Australia, so keep an eye on our events calendar. If you’d like to talk through fit before committing to a gun, reach out to our team.